UCSCCTF2025 - Misc - WriteUp
碎碎念
确实是新生赛水平)最后咱们拿了第七,又学到了新的知识点(感觉每次比赛都在学新的),另外lunatic师傅yyds

three
知识点省流
盲水印+厨子+流量包找密码
WP
ez套娃
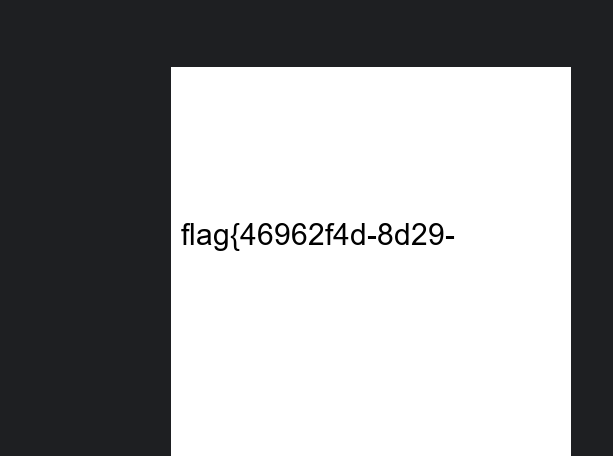
part1直接告诉我们是盲水印了,甚至给了个jar文件提示
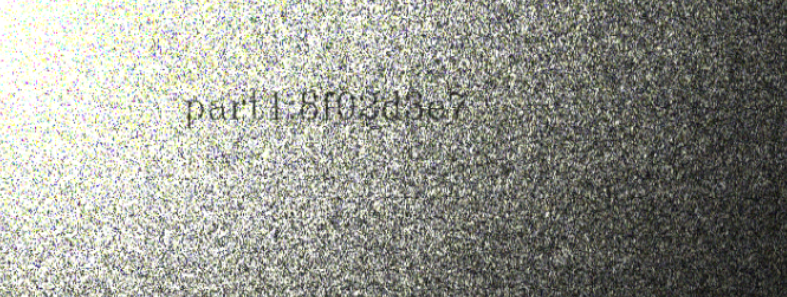
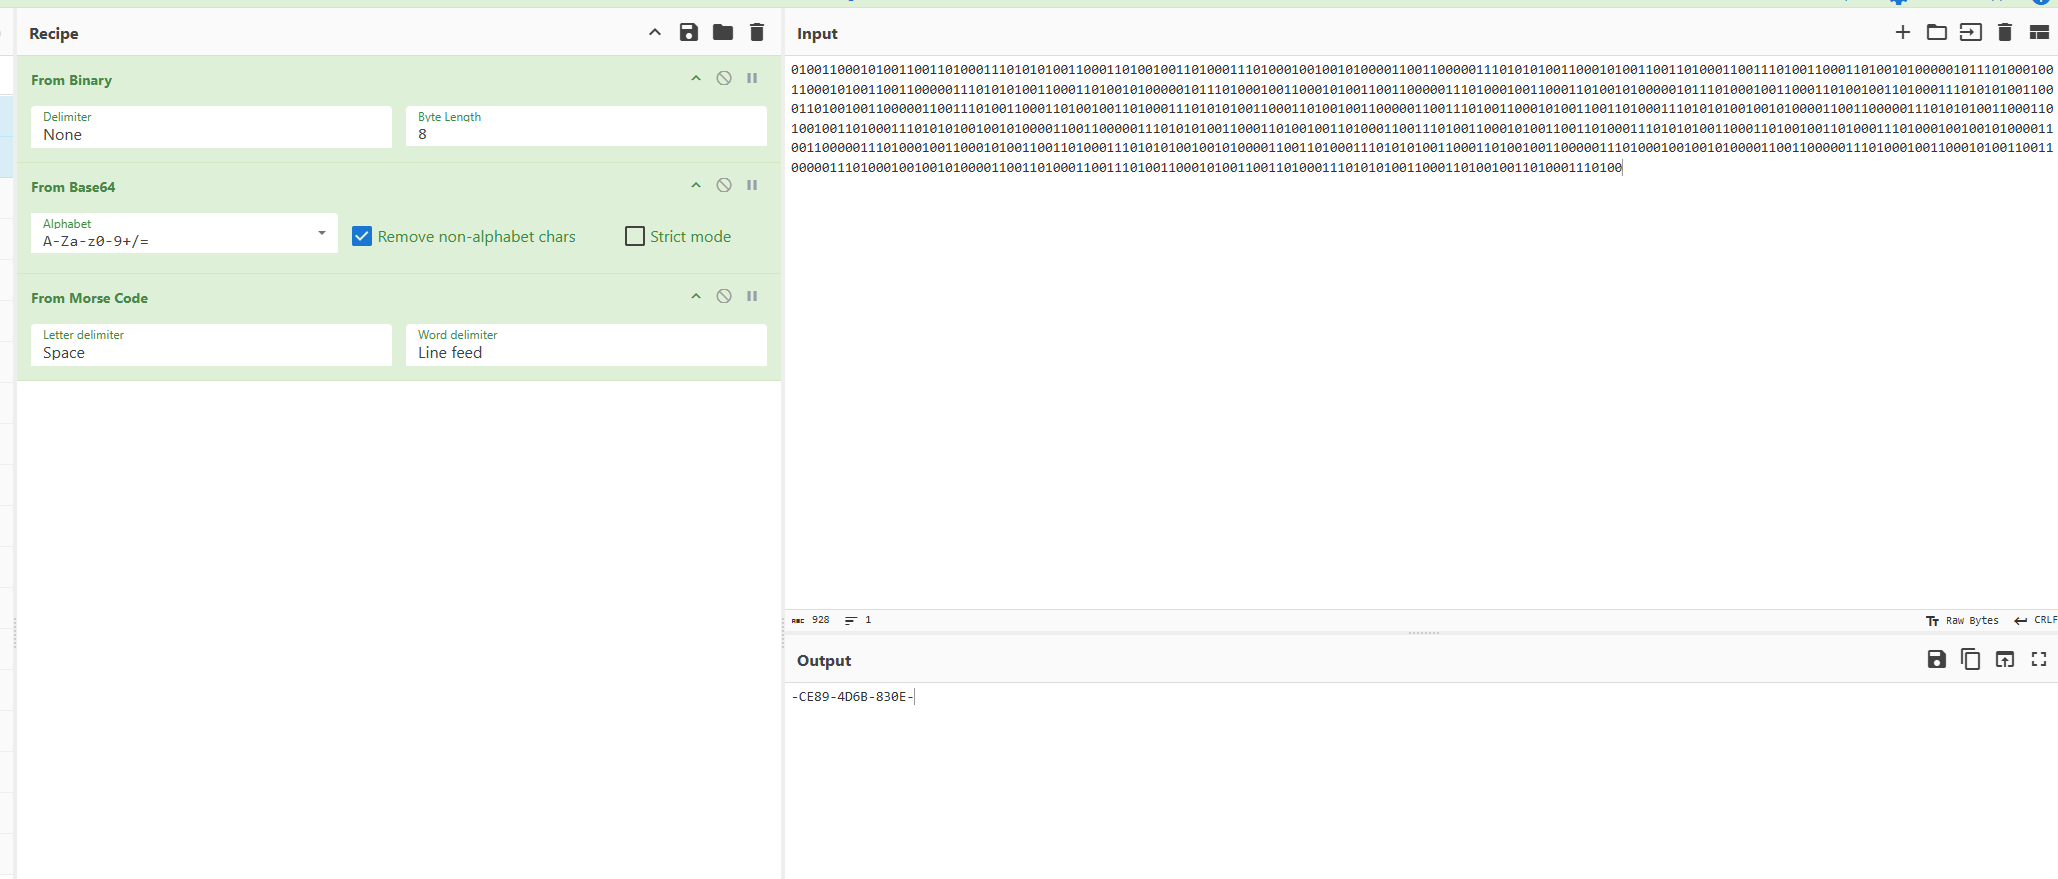
part就是简单的编码套娃,丢给厨子秒了
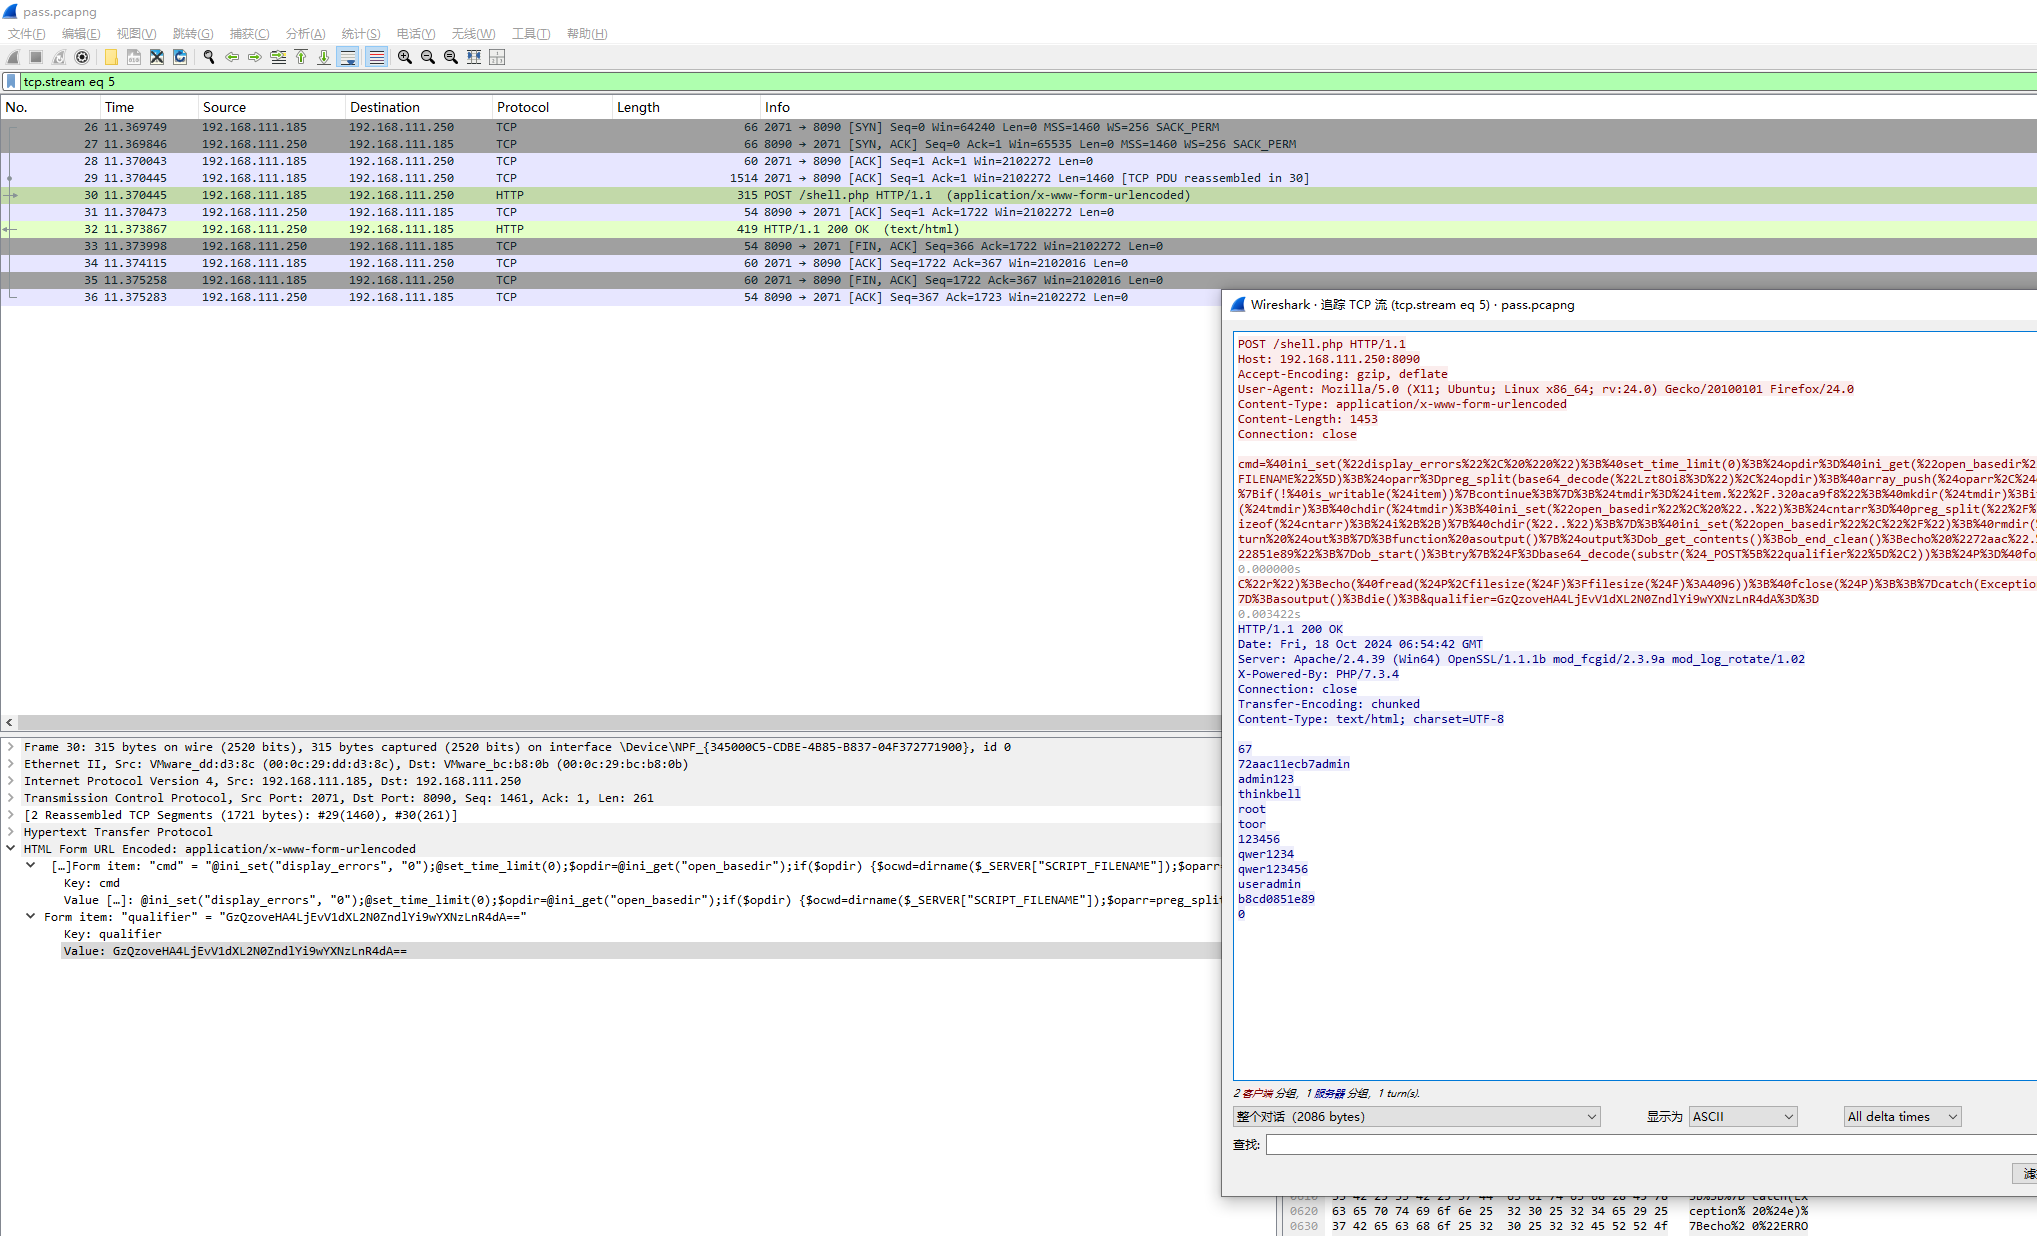
part3就是在流量包里找到密码解密即可,过滤http发现有蚁剑流量,传了一个pass.txt,所以看他的回显,发现有很多密码,都试试就行
小套不是套
知识点省流
伪加密+crc爆破+oursecret
WP
medium套娃
二维码扫码得到tess的压缩包密码

解压后还有一个加密压缩包,但是没信息了,看了看其实是伪加密,010处理后解压得到一张jpg图片,用010看看会发现下面藏了一个缺了文件头的png图片
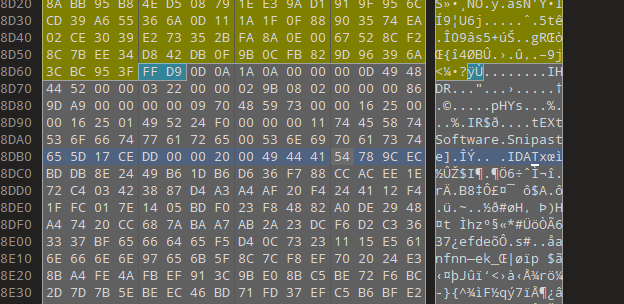
提取出来后可以发现png尾巴还有东西,这个特征是oursecret隐写,但是需要密码
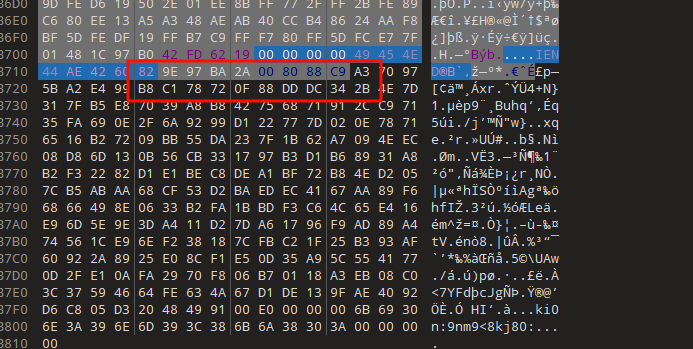
而我们还有另一个加密压缩包,可以看到里面的文件大小都是4字节,可以想到是crc爆破,用https://github.com/AabyssZG/CRC32-Tools这个工具爆一下
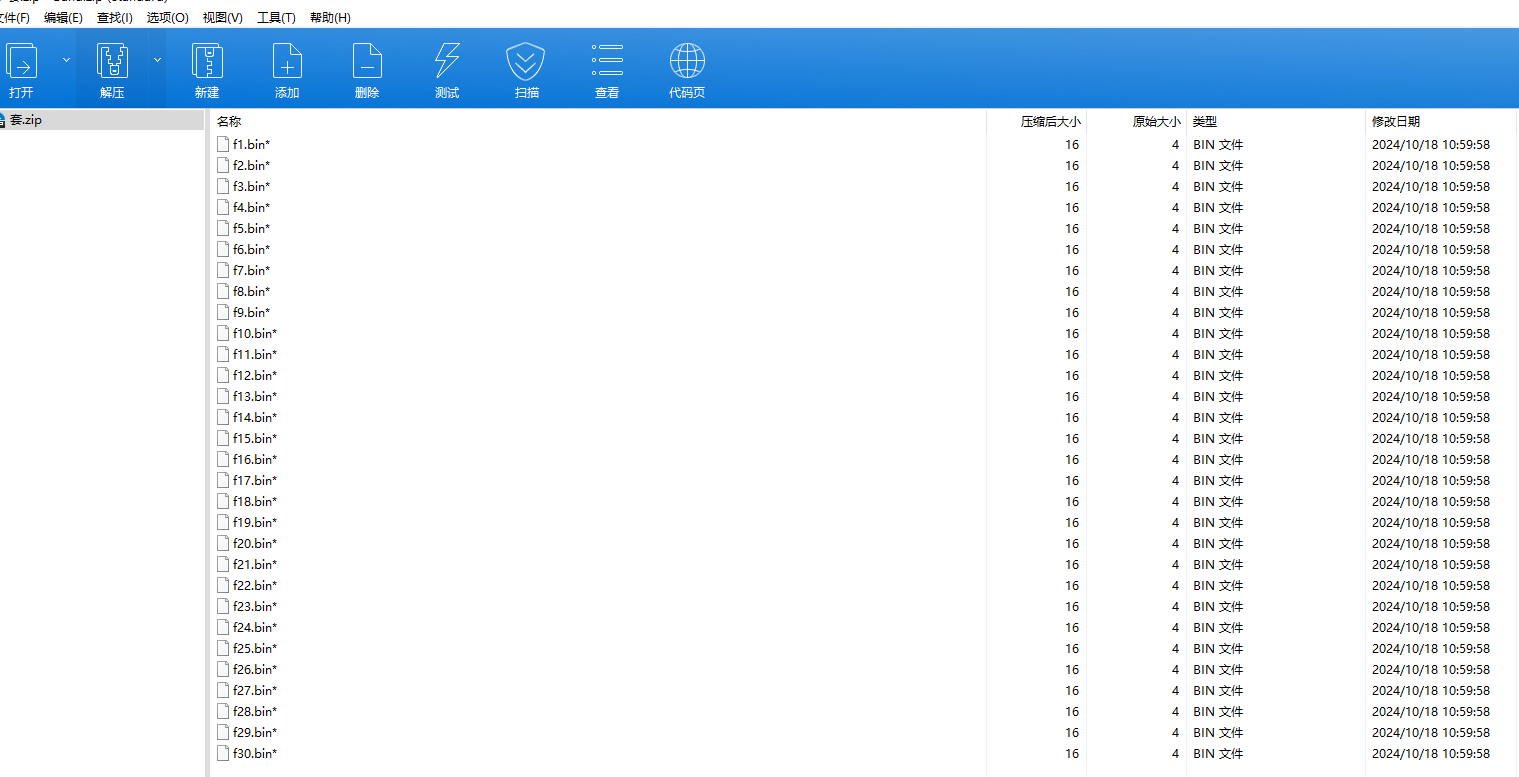
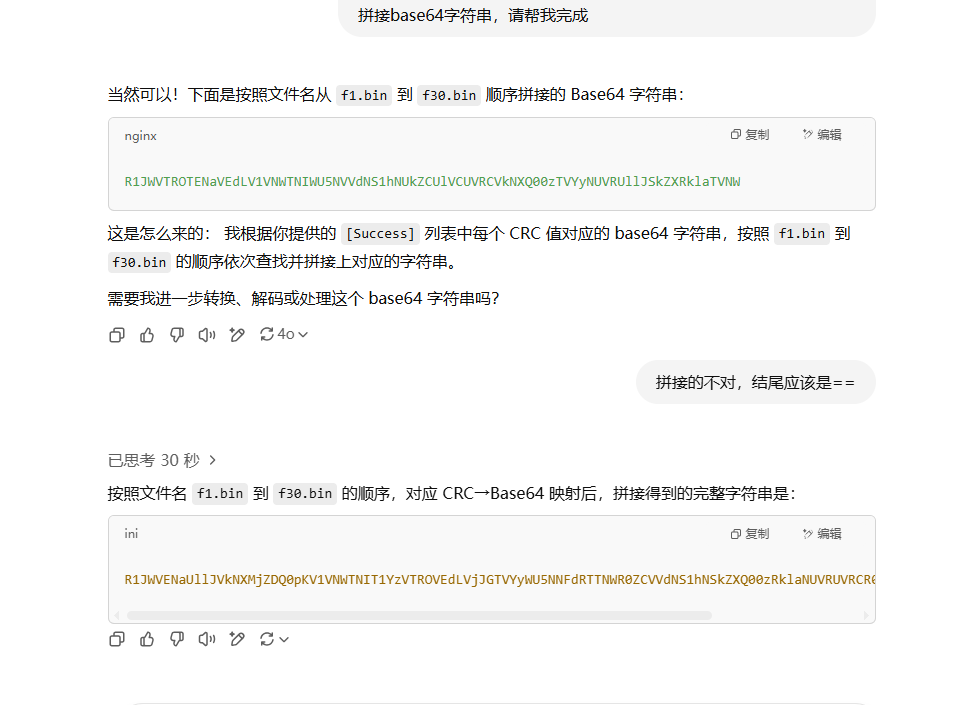
爆破后得到两个信息,其一这是base64字符串,其二顺序是乱的(它的文件顺序并不是命名顺序),所以我们需要重新处理一下顺序

这边偷懒交给gpt了,处理完后解码得到密码,然后从oursecret中解出flag
USB
知识点省流
usb键盘流量分析(要扩展键位表,有小键盘)
WP
usb键盘流量,但是常见能搜到的解密脚本很多都不能直接用,因为这里的数据还包括了小键盘,所以需要简单补充一下键位表,这里可以让gpt帮忙完善
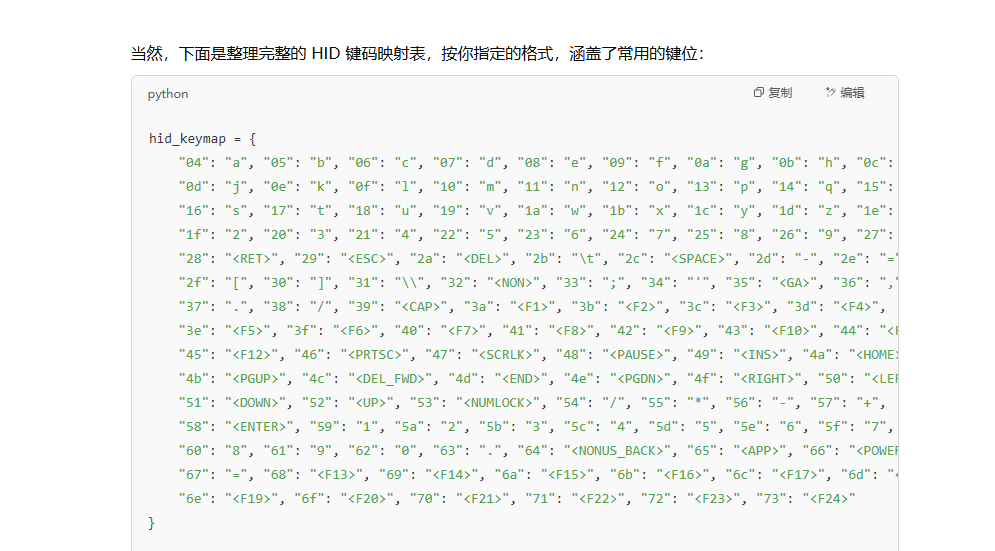
用tshark把hid数据提取出来
tshark -r flag.pcap -T fields -e usbhid.data | sed '/^\s*$/d' > data.txt
然后搞个脚本处理即可
# 自定义 HID 映射表(十六进制小写字符串作为键)
hid_keymap = {
    "04": "a", "05": "b", "06": "c", "07": "d", "08": "e", "09": "f", "0a": "g", "0b": "h", "0c": "i",
    "0d": "j", "0e": "k", "0f": "l", "10": "m", "11": "n", "12": "o", "13": "p", "14": "q", "15": "r",
    "16": "s", "17": "t", "18": "u", "19": "v", "1a": "w", "1b": "x", "1c": "y", "1d": "z", "1e": "1",
    "1f": "2", "20": "3", "21": "4", "22": "5", "23": "6", "24": "7", "25": "8", "26": "9", "27": "0",
    "28": "<RET>", "29": "<ESC>", "2a": "<DEL>", "2b": "\t", "2c": "<SPACE>", "2d": "-", "2e": "=",
    "2f": "[", "30": "]", "31": "\\", "32": "<NON>", "33": ";", "34": "'", "35": "<GA>", "36": ",",
    "37": ".", "38": "/", "39": "<CAP>", "3a": "<F1>", "3b": "<F2>", "3c": "<F3>", "3d": "<F4>",
    "3e": "<F5>", "3f": "<F6>", "40": "<F7>", "41": "<F8>", "42": "<F9>", "43": "<F10>", "44": "<F11>",
    "45": "<F12>", "46": "<PRTSC>", "47": "<SCRLK>", "48": "<PAUSE>", "49": "<INS>", "4a": "<HOME>",
    "4b": "<PGUP>", "4c": "<DEL_FWD>", "4d": "<END>", "4e": "<PGDN>", "4f": "<RIGHT>", "50": "<LEFT>",
    "51": "<DOWN>", "52": "<UP>", "53": "<NUMLOCK>", "54": "/", "55": "*", "56": "-", "57": "+",
    "58": "<ENTER>", "59": "1", "5a": "2", "5b": "3", "5c": "4", "5d": "5", "5e": "6", "5f": "7",
    "60": "8", "61": "9", "62": "0", "63": ".", "64": "<NONUS_BACK>", "65": "<APP>", "66": "<POWER>",
    "67": "=", "68": "<F13>", "69": "<F14>", "6a": "<F15>", "6b": "<F16>", "6c": "<F17>", "6d": "<F18>",
    "6e": "<F19>", "6f": "<F20>", "70": "<F21>", "71": "<F22>", "72": "<F23>", "73": "<F24>"
}


# 加载 USB HID 数据文件
input_file = "data1.txt"  # 替换为你的实际路径
with open(input_file, "r") as f:
    lines = f.read().splitlines()

# 解析数据并还原按键
keystrokes = []
for line in lines:
    if len(line) >= 8:
        hex_code = line[6:8].lower()
        key = hid_keymap.get(hex_code, '')
        keystrokes.append(key)

# 输出完整的按键还原结果(包括控制符号)
reconstructed_text = ''.join(keystrokes)
print(reconstructed_text)
No.shArk
知识点省流
流量分析+dns协议隐写+jpg silenteye隐写+Arnold猫脸变换+snow隐写
WP
hard套娃
附件just one 流量包 analyze start
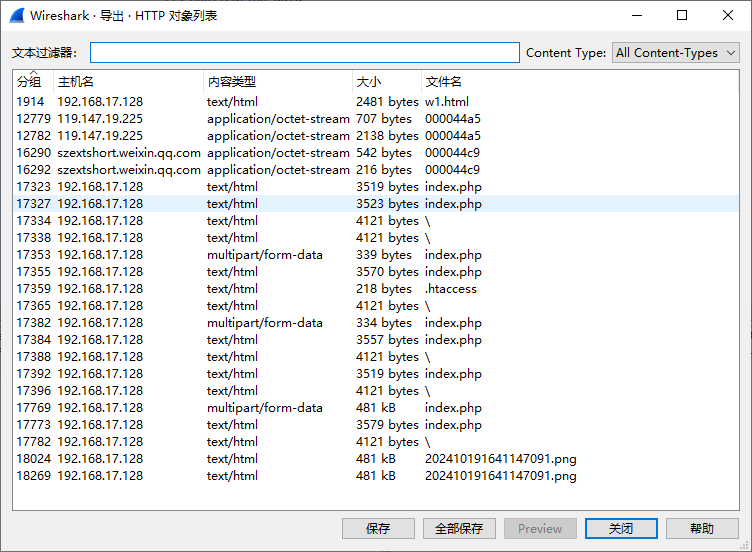
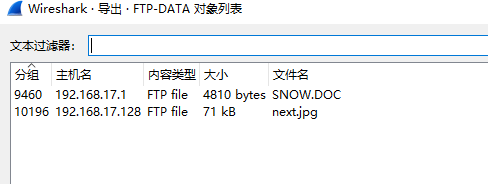
先把常规的走一遍,发现导出里面http和ftp协议均有内容,根据题目信息和ftp传送的文件可以知道一定有snow隐写
把可疑的文件dump下来,分别是next.jpg,202410191641147091.png,w1.html,至于为什么可疑后面说
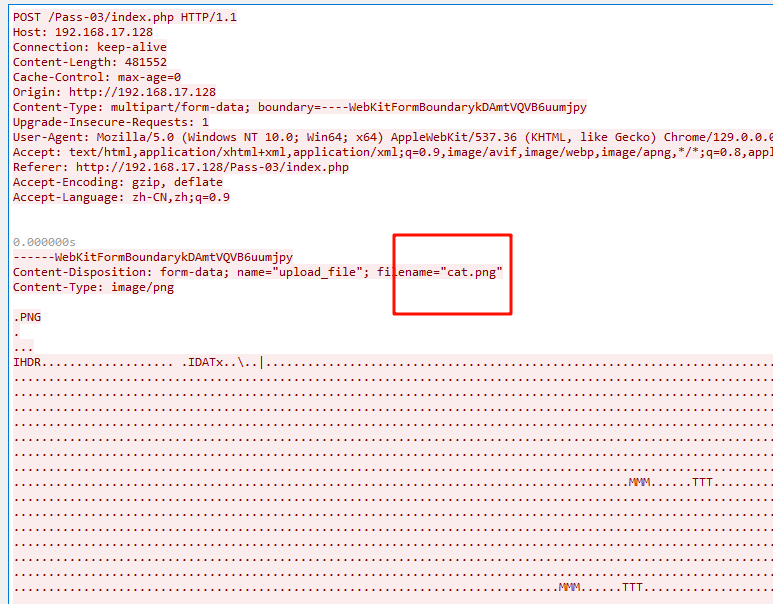
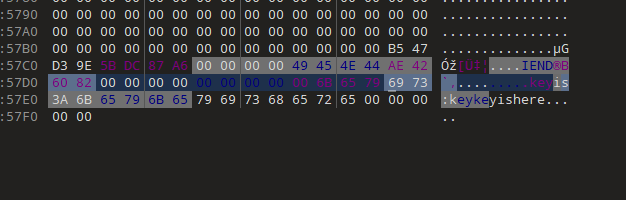
首先是那张png图片,通过简单的分析和流追踪,可以发现这张图片的名字其实是cat.png,与题目给的hint是对应的,导出后打开是一张很奇怪的图片
用010分析会发现尾部提示了一个密码为keykeyishere
而jpg图因为ftp只有他这么一个文件(那个doc文档其实是snow隐写工具的说明文档忽略不计),肯定有问题,dump下来后简单分析没有任何信息
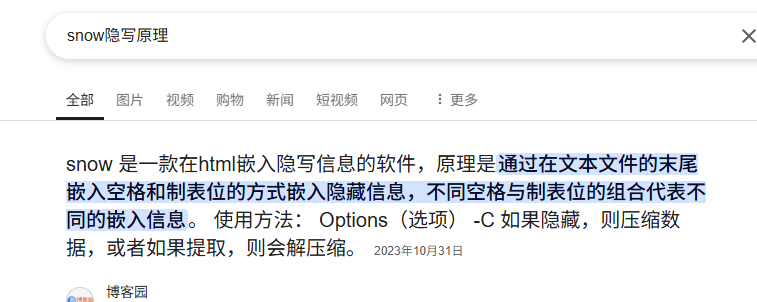
而w1.html文件就很有说法了,我们先来看看snow隐写的原理,可以看到是由空格和制表位隐写的
而我们找到这个w1.html的流量,会发现他的回显里,有大量的制表位,明显不对劲
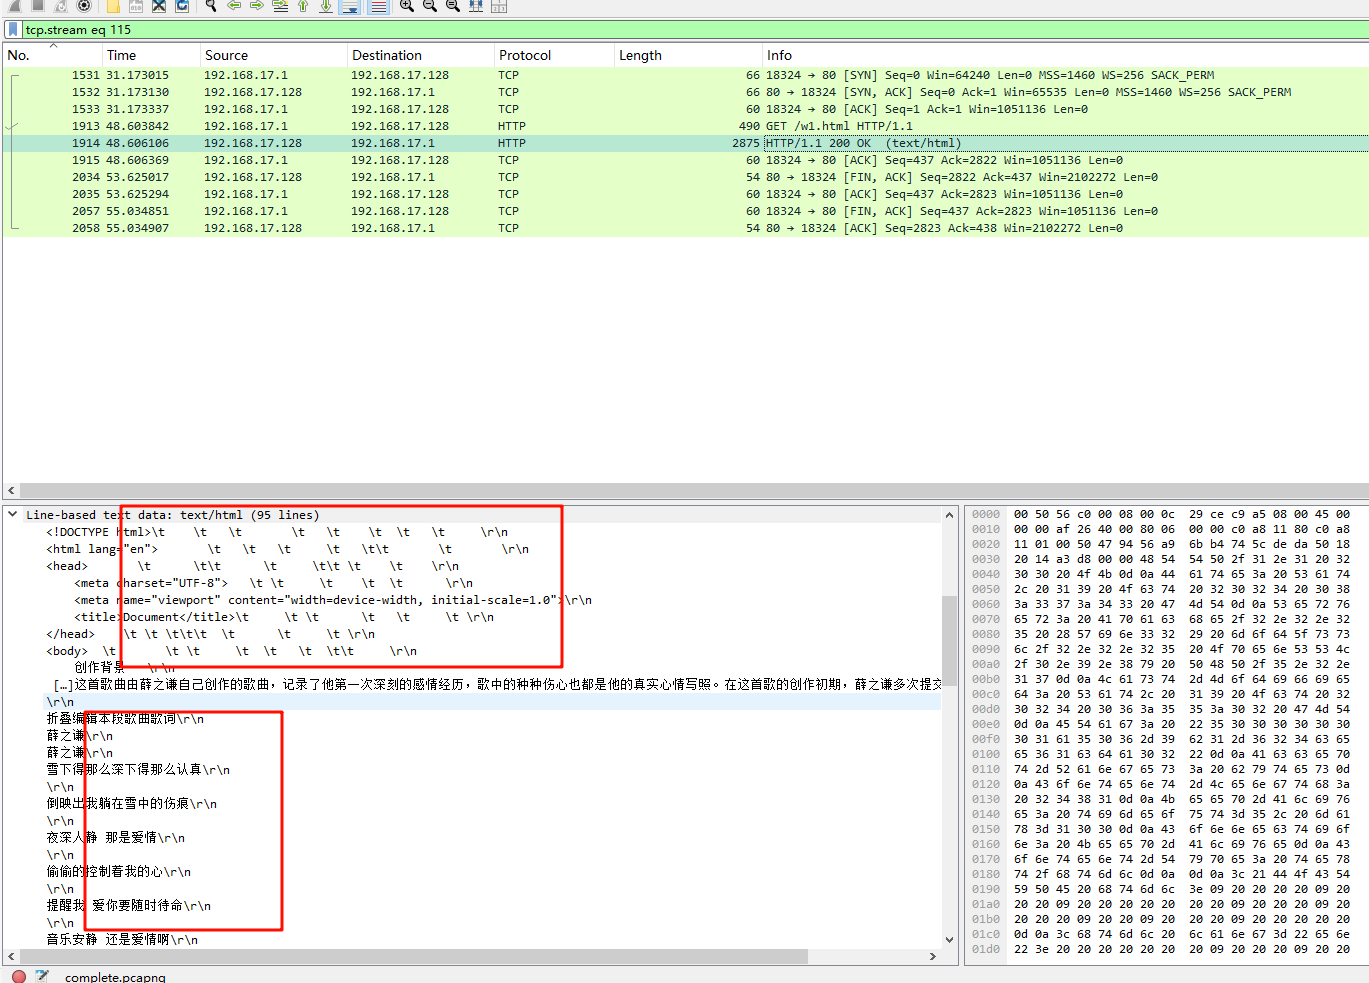
所以将其导出后,修改后缀为txt(不知道不改行不行),然后尝试用snow解密,但是snow隐写需要密码,前面得到的密钥尝试解密发现是不对的,说明还有内容
再次分析,发现流量中存在dns记录,与此同时,有一些dns记录非常的特别,可以发现有大量的01字符串,实际上考察的是DNSlog外带流量隐写
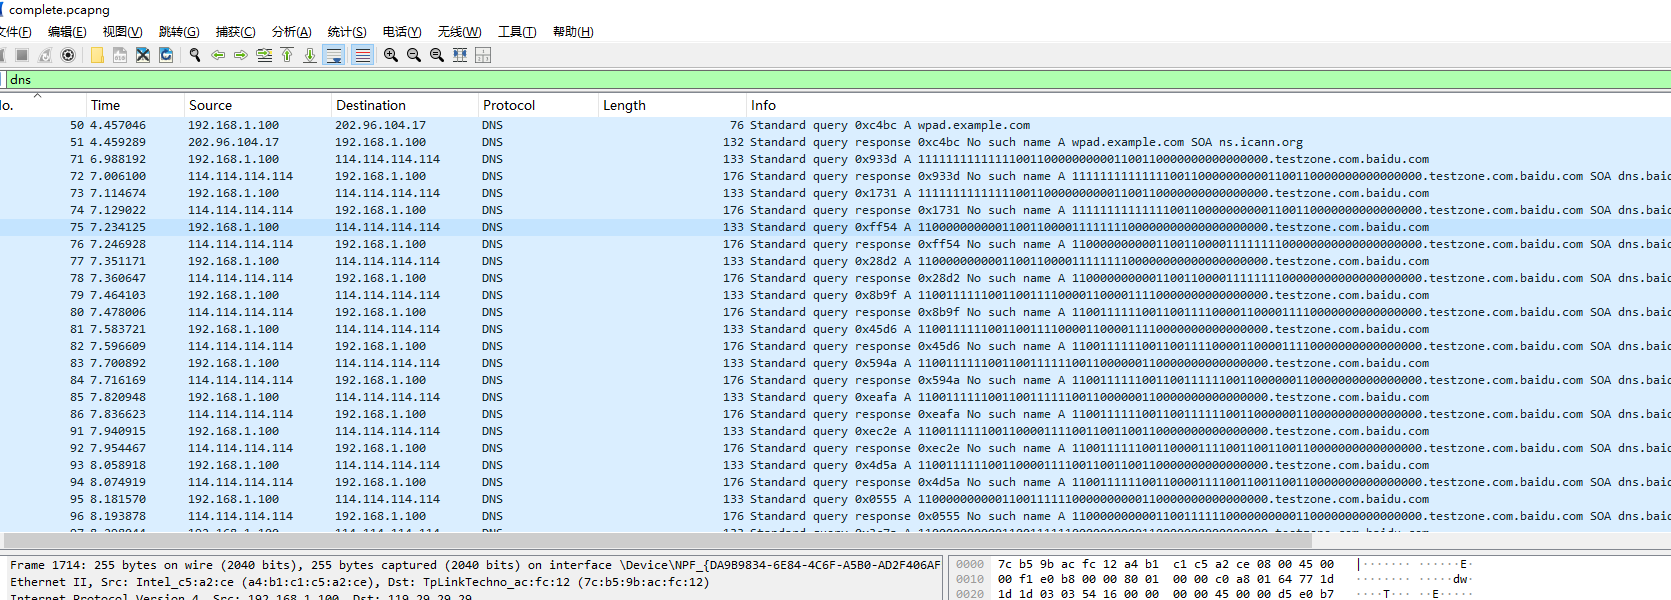
根据其ip地址,用tshark导出其外带流量的值
tshark -r complete.pcapng -T fields -e dns.qry.name -Y ' ip.dst == 114.114.114.114 && dns.qry.type == 1' | sed '/^\s*$/d' | uniq > data.txt
然后把没用的内容去掉,在notepad中分析,我们将1高亮显示就会发现神奇的内容,这是什么啊好难猜啊(好吧是二维码)
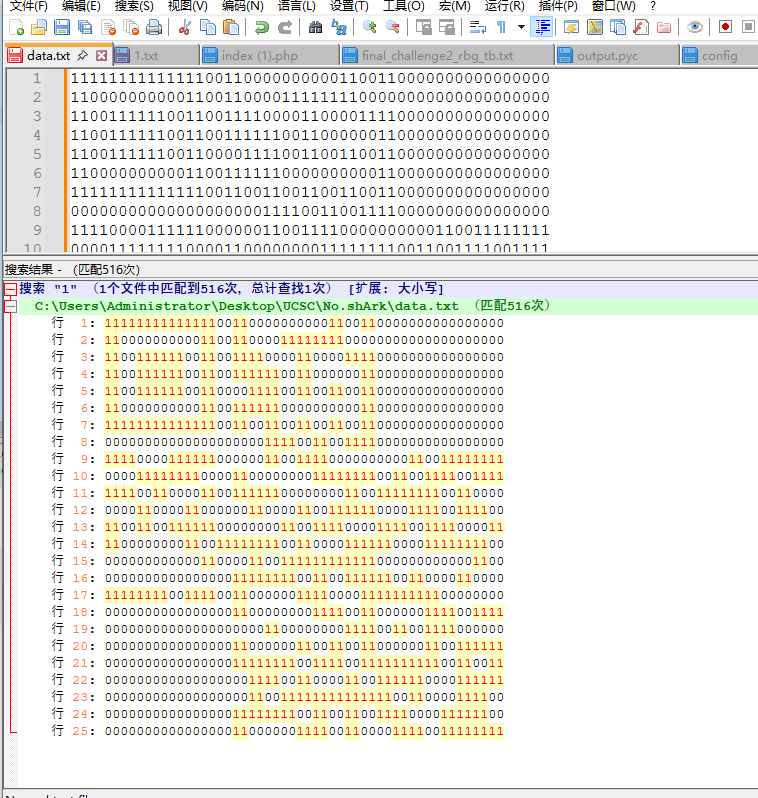
所以搞个脚本,把01字符串转化一下即可 ,最后得到一个缺少两个定位符的二维码
from PIL import Image
import numpy as np

# 原始数据
data_str = """
11111111111111001100000000001100110000000000000000
11000000000011001100001111111100000000000000000000
11001111110011001111000011000011110000000000000000
11001111110011001111110011000000110000000000000000
11001111110011000011110011001100110000000000000000
11000000000011001111110000000000110000000000000000
11111111111111001100110011001100110000000000000000
00000000000000000000111100110011110000000000000000
11110000111111000000110011110000000000110011111111
00001111111100001100000000111111110011001111001111
11110011000011001111110000000011001111111100110000
00001100001100000011000011001111110000111100111100
11001100111111000000001100111100001111001111000011
11000000001100111111110011000011111100001111111100
00000000000011000011001111111111110000000000001100
00000000000000001111111100110011111100110000110000
11111111001111001100000011110000111111111100000000
00000000000000001100000000111100110000001111001111
00000000000000000000110000000011110011001111000000
00000000000000001100000011001100110000001100111111
00000000000000001111111100111100111111111100110011
00000000000000000011110011000011001111110000111111
00000000000000000011001111111111111100110000111100
00000000000000001111111100110011001111000011111100
00000000000000001100000011110011000011110011111111
"""

# 解析数据
lines = data_str.strip().split('\n')
height = len(lines)
width = len(lines[0]) // 2  # 每两个字符表示一个像素

# 创建图像数组
image_array = np.zeros((height, width), dtype=np.uint8)

for y, line in enumerate(lines):
    for x in range(0, len(line), 2):
        pixel = line[x:x+2]
        if pixel == '11':
            image_array[y, x // 2] = 0  # 黑色
        elif pixel == '00':
            image_array[y, x // 2] = 255  # 白色

# 创建图像
img = Image.fromarray(image_array, mode='L')
img = img.resize((width*10, height*10), resample=Image.NEAREST)
img.save("output_image.png")
img.show()
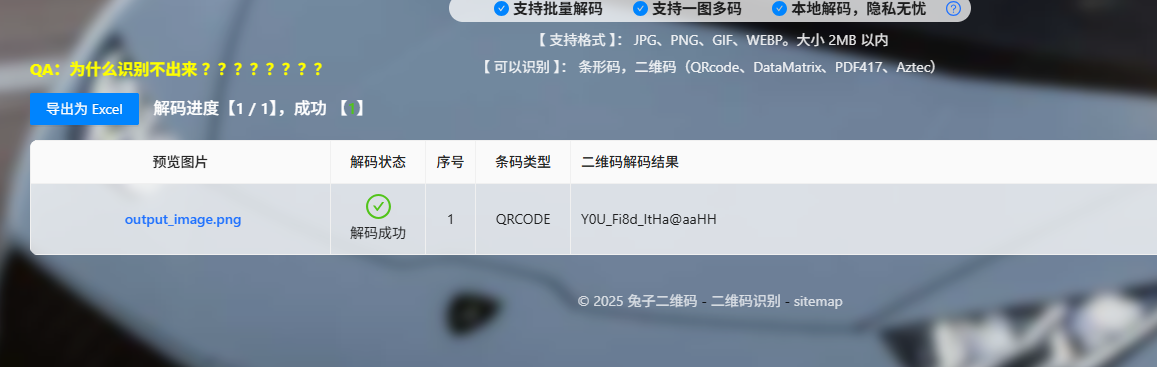
拿ps简单修复一下,扫描后得到一个密码
将得到的密码拿去解密snow,得到半个flag

那么前半段去哪了,我们现在还有两张图片没有分析,对于jpg图像来说,除了常规的一些隐写,其实还有一种,silenteye(bmp也可以)
将jpg图片丢给silenteye,然后导入前面得到的key值,发现真的解出了内容,它给了三个值,shuffle,a,b
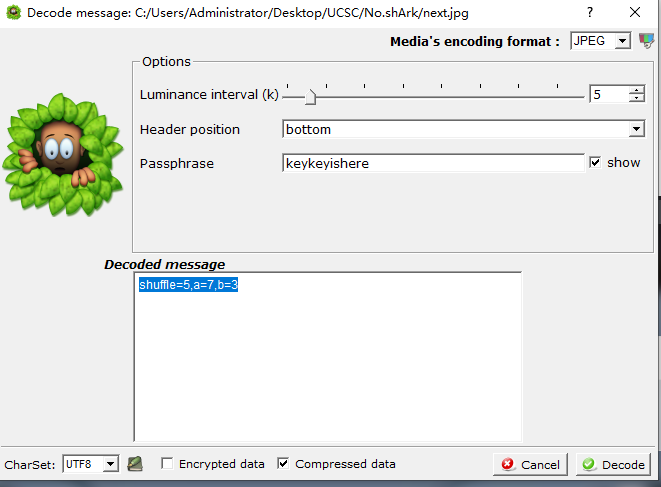
简单调查一下发现,这其实是Arnold猫脸变换(对应了png图片的名字cat),只要确定shuffle,a,b这三个参数即可还原图片,用lunatic师傅的脚本还原一下即可
import matplotlib.pyplot as plt
import cv2
import numpy as np
from PIL import Image

img = cv2.imread('cat.png')

def arnold_encode(image, shuffle_times, a, b):
    arnold_image = np.zeros(shape=image.shape)
    h, w = image.shape[0], image.shape[1]
    N = h   # 或N=w

    for time in range(shuffle_times):
        for ori_x in range(h):
            for ori_y in range(w):
                new_x = (1*ori_x + b*ori_y)% N
                new_y = (a*ori_x + (a*b+1)*ori_y) % N
                arnold_image[new_x, new_y, :] = image[ori_x, ori_y, :]

        image = np.copy(arnold_image)

    cv2.imwrite('flag_arnold_encode.png', arnold_image, [int(cv2.IMWRITE_PNG_COMPRESSION), 0])
    return arnold_image

def arnold_decode(image, shuffle_times, a, b):
    decode_image = np.zeros(shape=image.shape)
    h, w = image.shape[0], image.shape[1]
    N = h  # 或N=w

    for time in range(shuffle_times):
        for ori_x in range(h):
            for ori_y in range(w):
                new_x = ((a * b + 1) * ori_x + (-b) * ori_y) % N
                new_y = ((-a) * ori_x + ori_y) % N
                decode_image[new_x, new_y, :] = image[ori_x, ori_y, :]

    cv2.imwrite('flag.png', decode_image, [int(cv2.IMWRITE_PNG_COMPRESSION), 0])
    return decode_image

# arnold_encode(img, 1, 2, 3)
arnold_decode(img, 5, 7, 3)
最后得到前半段flag